High performance Symfony webapps
Kévin Dunglas
- CEO at Les-Tilleuls.coop
- Symfony core-team
- API Platform creator
- @dunglas

Sorry about my french flavored english

How to design a web app:
- super fast to browse
- easy to scale
- robust (high availability)
- requiring no server maintenance
- easy to setup
- relying on open standards
- and using standard PHP libraries
We want
- An architecture usable both for startups and big companies.
- To deploy a new app in a few minutes...
- but to be able to handle high traffic
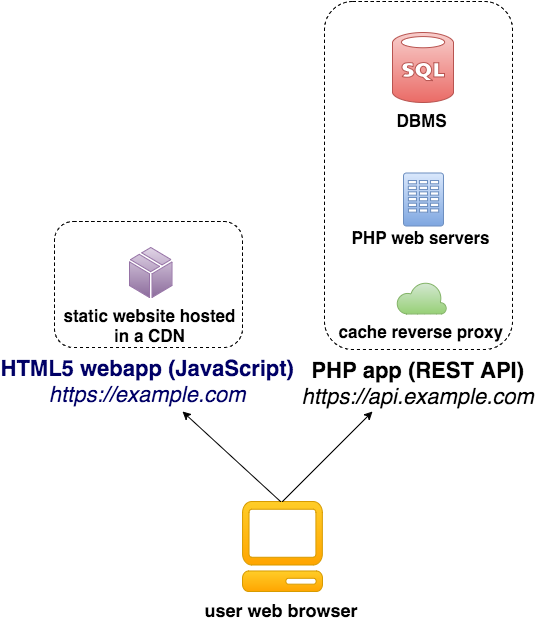
The big picture
Two separate components
- A static HTML5 webapp (SPA)
- A web API
The web API
- Centralizes R/W access to data
- Holds all the business logic
- Is built with PHP/Symfony
- Is stateless (PHP sessions makes horizontal scalability harder)
The HTML5 webapp
- Holds all the presentation logic
- Is downloaded first (Single Page Application)
- Queries the API to retrieve and modify data using AJAX
- Is 100% composed of HTML, JavaScript and CSS assets
The API and the web app are standalone
- 2 Git repositories and 2 CI
- different servers
- 2 domain names:
example.com,api.example.com - The routing is done client-side using HTML5 push state
Immediate benefits
Speed (even on mobile)
- Assets including index.html are downloaded from a CDN
- After the first page load: no more download/parse/render bunch of HTML required at each request
- Only small chunks of raw data transit on the network
- API responses can be cached by the proxy
Scalability and robustness
- The front app is just a set of static files: can be hosted in a CDN
- Stateless API: push and pop servers/containers on demand
Development comfort
- A wizard, an autocomplete box? Do it in JS, no more Symfony forms! (API data validation required)
- Reuse the API in other contexts: native mobile, game stations, TV apps, connected devices or heavy desktop clients
- Give access to your customers and partners to access to raw data trough the API
Long term benefits
- Better structure: thanks to the central API, less business logic duplication when the app grows
- Easier refactoring: Touching a component has no impact on the other (spec and test the API format)
- Simpler project management: Separate teams can work on each app
Drawbacks
SEO and SMO
Formats, (open) standards, patterns
HTTP + REST + JSON
- Work everywhere
- Lightweight
- Stateless
- HTTP has a powerful caching model
- Extensible (JSON-LD, Hydra, HAL, JSON Schema...)
- High quality tooling
JSON Web Token (JWT)
- Lightweight and simple authentication system: good bye OAuth
- Stateless: token signed and verified server-side then stored client-side and sent with each request in an Authorization header
- Store the token in the browser local storage
Infrastructure
A robust and secure infrastructure
- Redundant: if a server crash, another must replace it immediately
- Maintained: updates must be applied when available
- Monitored: we must know when something goes wrong
- DOS/DDOS attacks resistant
- Encrypted connections
An infrastructure that scale
- Horizontal scalability: push and pop new servers on-demand
- Load balanced: share the load between available servers
- Able to replicate data near the user (CDN)
Complex and expensive
Requires a lot of:
- hardware
- skills
- time
Delegate the complexity
- Infrastructure as a Service (IaaS): provide computing power, storage, bandwidth...
- Platform as a Service (PaaS): run applications
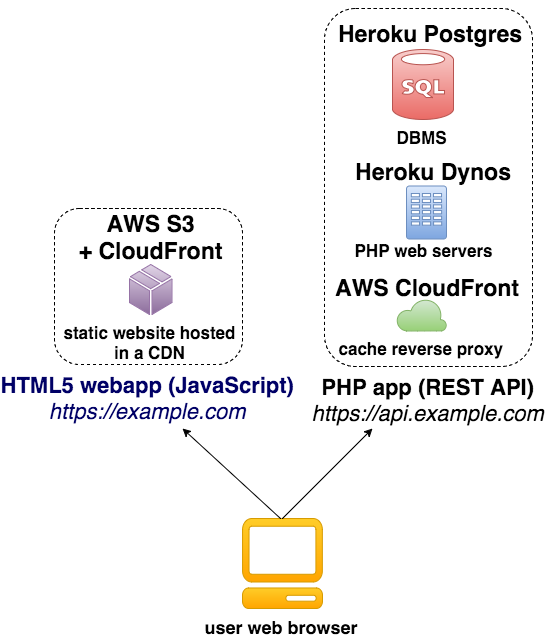
Our choice
HTML5 webapp hosting
- Uploaded in a Amazon S3 bucket (storage) by the CI
- Configure the bucket to act as a website
- Configure Amazon CloudFront (CDN) in front of it with a custom domain name
- All non-existing URLs load to
index.html(client-side routing)
Why?
- Cheap
- Fast (CDN)
- Easy to setup
- Scale automatically
- No maintenance
- Easy to support different environments
Alternatives: GitHub pages, Google Cloud Storage, Azure, Akamai
PHP API hosting
- Heroku Platform
- Database using Heroku Postgres
- Amazon CloudFront as cache reverse-proxy in front of Heroku

- No maintenance
- Run on the Amazon hardware
- Scalability: Easy to add more dynos (containers) or larger database servers
- Battery included: centralized logs, scheduler, ability to run Symfony commands...
- Integrated with GitHub (test env for each PR)
- Many quality add-ons (databases, Redis, New Relic, mails, autoscaling...)
- HHVM and PHP 7 out of the box support
Alternatives: Platform.sh, Amazon Beanstalk, Google App Engine
- DNS: Amazon Route 53
- Mail: SendGrid (as Heroku add-on)
- Monitoring: New Relic (as Heroku add-on)
Other
Creating the API
API Platform
An easy to use framework dedicated to API development.
Create an entity (Doctrine + Validator)
// src/AppBundle/Entity/Person.php

namespace AppBundle\Entity;

use Doctrine\ORM\Mapping as ORM;
use Symfony\Component\Validator\Constraints as Assert;

/**
 * @ORM\Entity
 */
class Person
{
    /**
     * @ORM\Column(type="integer")
     * @ORM\Id
     * @ORM\GeneratedValue(strategy="AUTO")
     */
    private $id;
    /**
     * @ORM\Column(nullable=true)
     * @Assert\Type(type="string")
     */
    private $name;
    /**
     * Yes it works with relations too.
     *
     * @ORM\ManyToOne(targetEntity="PostalAddress")
     */
    private $address;

    // Getter and setters
}
Register a service
# app/config/services.yml

services:
    resource.person:
        parent:    'api.resource'
        arguments: [ 'AppBundle\Entity\Person' ]
    tags:      [ { name: "api.resource" } ]
You have:
- Full CRUD with support for relations and dates
- Data validation
- Collections pagination
- Serialization and validation groups
- Error serialization
- Automatic routes registration
- Filters on exposed properties
- Sorting
- Automatically generated API doc
- Native hypermedia support (JSON-LD + Hydra)
GET /people
{
    "@context": "/contexts/Person",
    "@id": "/people",
    "@type": "hydra:PagedCollection",
    "hydra:totalItems": 1,
    "hydra:itemsPerPage": 30,
    "hydra:firstPage": "/people",
    "hydra:lastPage": "/people",
    "hydra:member": [
        {
            "@id": "/people/1",
            "@type": "http://schema.org/Person",
            "name": "Kevin",
            "address": "/addresses/28"
        }
    ]
}And many more features
- Powerful event system (ex: send a mail after a
POST) - Embed relations (ex:
GETproducts and its related offers) - Custom operations and controllers
- Custom filters and sorting options
- Content Negotiation (experimental)
Alternatives: FOSRestBundle, LemonRestBundle
CORS with NelmioCorsBundle
- The webapp and the API have different domain names.
- CORS headers must be set by the API to let the webapp querying it:
# src/app/config.yml

nelmio_cors:
    defaults:
        allow_origin:  ["https://example.com"]
        allow_methods: ["POST", "PUT", "GET", "DELETE", "OPTIONS"]
        allow_headers: ["content-type", "authorization"]
        max_age:       3600
    paths:
        '^/': ~
Security with LexikJwtAuth[...]Bundle
- Makes the Symfony form login returning a JWT token instead of setting a cookie (stateless)
- Allows to use Symfony firewall rules to secure API endpoints
# app/config/security.yml

security:
    # ...
    firewalls:
        login:
            pattern:  ^/login$
            stateless: true
            anonymous: true
            form_login:
                check_path: /login
                success_handler: lexik_jwt_authentication.handler.authentication_success
                failure_handler: lexik_jwt_authentication.handler.authentication_failure
            require_previous_session: false

        api:
            pattern:   ^/
            stateless: true
            lexik_jwt: ~

    access_control:
        - { path: ^/, roles: ROLE_ANONYMOUS, methods: [GET] }
        - { path: ^/special, roles: ROLE_USER }
        - { path: ^/, roles: ROLE_ADMIN }
Cache with FOSHttpCache
fos_http_cache:
    cache_control:
        rules:
        -
            match:
                path: ^/content$
            headers:
                cache_control:
                    public: true
                    max_age: 64000
                    etag: true
Parameters using environment variable
- PaaS (including Heroku) use environment variables for the conf
- Symfony parameters can be set using them
heroku config:set SYMFONY__MY_PARAMETER_NAME=abc # Heroku configexport SYMFONY__MY_PARAMETER_NAME=abc # local machinemy_bundle:
parameter: %my_parameter_name%
heroku config:set MY_PARAMETER_NAME=abc # Heroku configexport MY_PARAMETER_NAME=abc # local machine// composer.json
{
"extra": {
"incenteev-parameters": {
"env-map": {
"my_param": "MY_PARAMETER_NAME"
}
}
}
}Specs and tests with Behat
Behat and its Behatch extension make testing and API easy.
# features/put.feature
Scenario: Update a resource
    When I send a "PUT" request to "/people/1" with body:
    """
    {
      "name": "Kevin"
    }
    """
    Then the response status code should be 200
    And the response should be in JSON
    And the header "Content-Type" should be equal to "application/ld+json"
    And the JSON should be equal to:
    """
    {
      "@context": "/contexts/Person",
      "@id": "/people/1",
      "@type": "Person",
      "name": "Kevin",
      "address": null
    }
    """
Tools for the static webapp
- Angular, React, Ember, Backbone or anything else
- Restangular
- Auth0 JWT libraries
- Yeoman, Gulp or Grunt, Bower, Jasmine, Karma...
A JavaScript client
'use strict';

angular.module('myApp')
    .controller('MainCtrl', function ($scope, Restangular) {
        var peopleApi = Restangular.all('people');

        function loadPeople() {
            peopleApi.getList().then(function (people) {
                $scope.people = people;
            });
        }

        loadPeople();

        $scope.newPerson = {};
        $scope.success = false;
        $scope.errorTitle = false;
        $scope.errorDescription = false;

        $scope.createPerson = function (form) {
            peopleApi.post($scope.newPerson).then(function () {
                loadPeople();

                $scope.success = true;
                $scope.errorTitle = false;
                $scope.errorDescription = false;

                $scope.newPerson = {};
                form.$setPristine();
            }, function (response) {
                $scope.success = false;
                $scope.errorTitle = response.data['hydra:title'];
                $scope.errorDescription = response.data['hydra:description'];
            });
        };
});Deploying the API using Heroku
- Create an Heroku account
- Install the Heroku toolbelt
- Adapt the Symfony configuration following the official doc (easy)
- Install my Heroku Postgres/Symfony configuration bridge
heroku create # Create an Heroku app
heroku config:set SYMFONY_ENV=prod # Set the Symfony env
heroku addons:create heroku-postgresql:hobby-dev # Add Heroku Postgres
git push heroku master # Deploy the API
heroku run "app/console doctrine:schema:create" # Create Postgres tables
The API is up and running with an URL like
https://shielded-cliffs-1234.herokuapp.com (can be customized)
heroku ps:scale web+5 # Add 5 more web servers in the pool